Eggbox in Transit - soon to be settled again!

Category: Gaming (Page 1 of 2)

Posts relating to some form of gaming

Nine Worlds 2017 in sketchnotes – Part 3 – Sunday

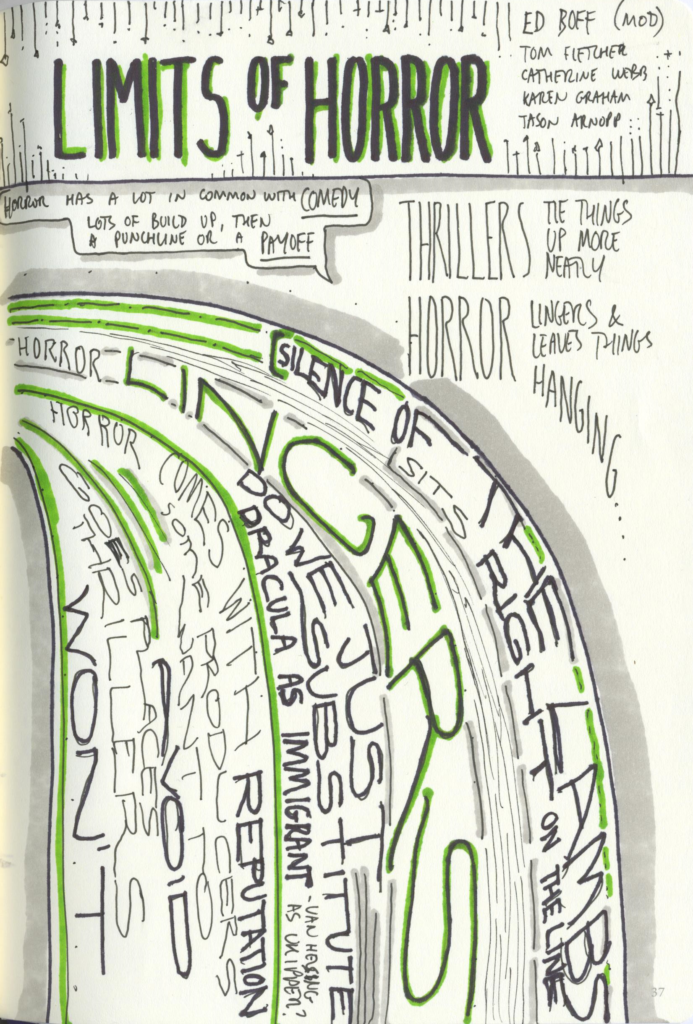
Limits of Horror

I had mistakenly included this in my Saturday sketchnotes before.  I’ve moved it from there and placed it here instead, so if it looks familiar, that would be why!

I confess this is one of my less readable sketchnotes.  But I like it because I picked a thematic layout and managed to largely stick with it all the way through.

Ed (a friend and the moderator of this panel) gently prodded the panellists enough that they could have a discussion in which he was also a participant without taking over… feeding in a few examples or cues along the way to keep things rolling, and also being a walking encyclopedia of film – always useful on this kind of panel!

Unsurprisingly, the general opinion of the panel seemed to be that there isn’t really a hard line between Horror and Thriller… and a lot of where that fuzzy line sits doesn’t come down to the majority of the work, but instead to how much it leaves hanging.

Scanned Sketchnotes from The Limits of Horror

Sketchnotes from The Limits of Horror

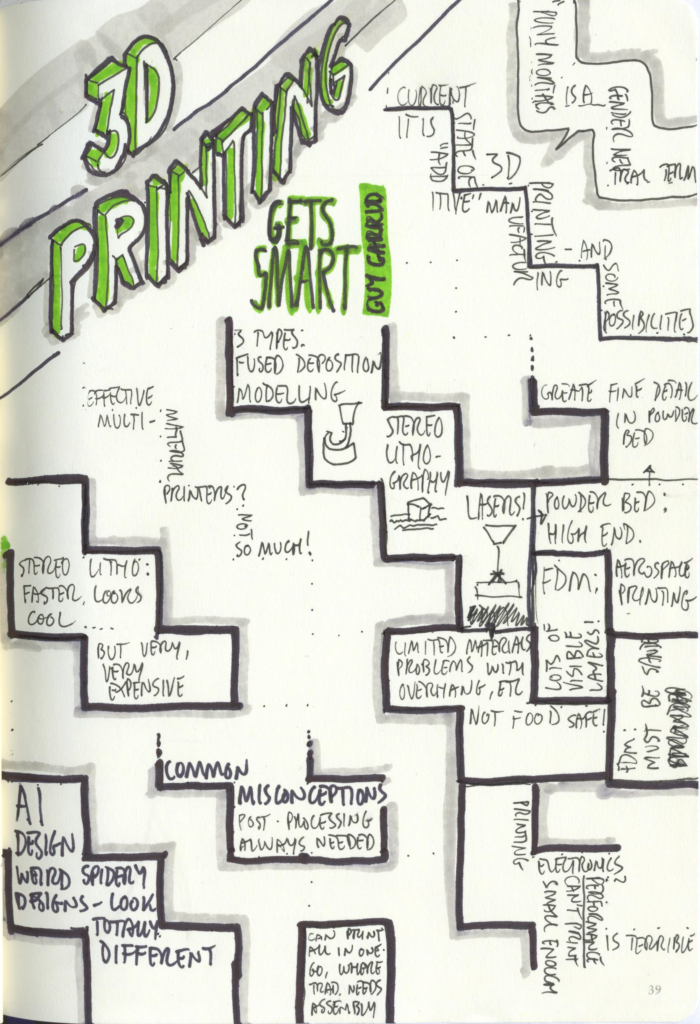
3D Printing Gets Smart

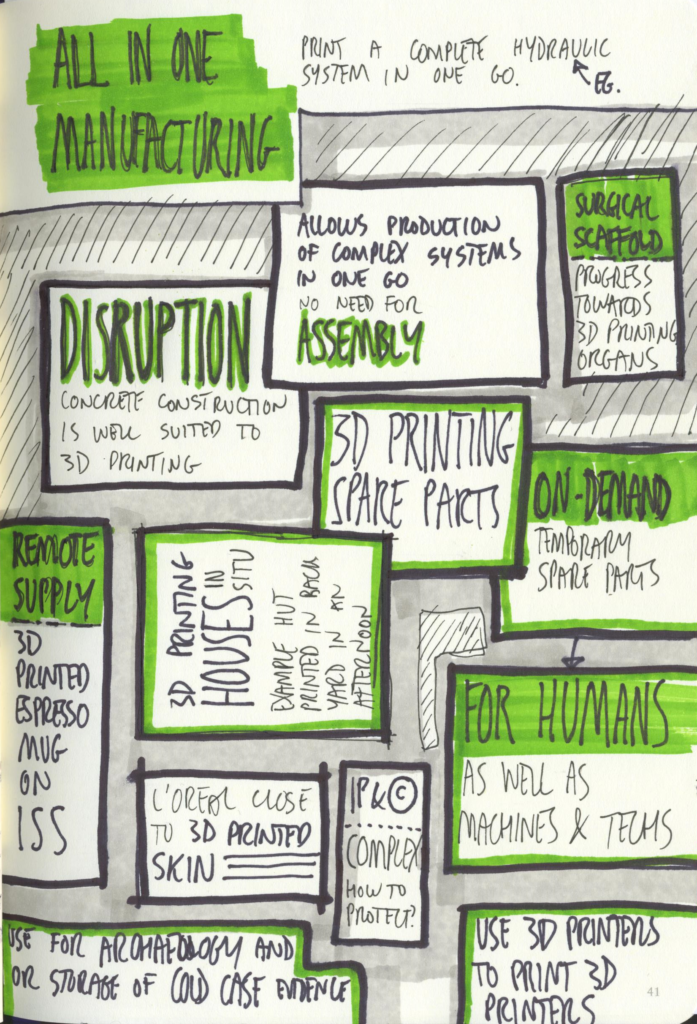
I nearly didn’t go to this panel, as I’ve heard a lot of talk about 3d printing over the years and it’s all got rather repetitive…  but I ended up attending due to either a gap or a full panel elsewhere (I forget which). I’m glad I did, as it managed to cover new ground whilst remaining grounded in reality. I’m not able to add much beyond what’s in the sketchnotes, so here they are!

Scanned sketchnotes from 3D Printing Gets Smart

Sketchnotes from 3D Printing Gets Smart (1 of 2)

Scanned sketchnotes from 3D Printing Gets Smart

Sketchnotes from 3D Printing Gets Smart (2 of 2)

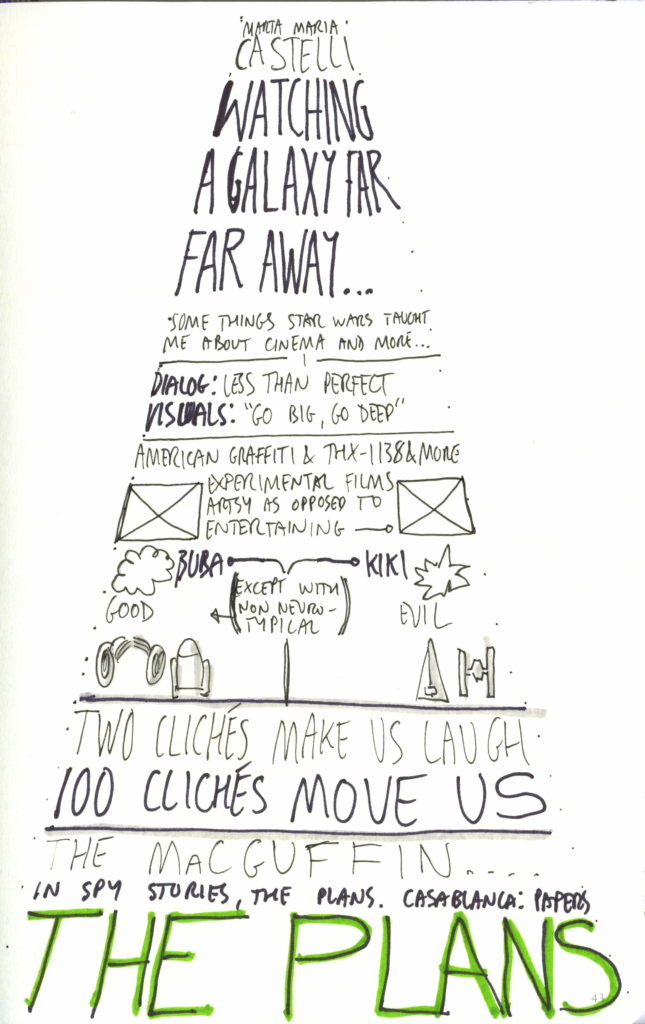
Watching a Galaxy Far, Far away

I wasn’t sure what to go to after the 3d printing session either.  I’d halfway assumed that anything star-wars focussed would be packed out (it often is) and that it might be a bit of slow or tedious listen – being a single-person presentation about that person’s personal experience of star wars.  But I wanted to go to something in this slot, and in the end, this was the least unlikely looking for me (the others didn’t look bad, to be clear, just not for me at that point in time, or involving a speaker or moderator I’d decided I’d heard enough of for the time being).

How wrong could I be!

Heartfelt, personal and loaded with interesting bits and pieces about both the star wars films and the times and culture the speaker grew up in – I think I’d say this was one of my high points of the con.  It’s certainly stuck with me more than some of the panel discussions did – and they were generally to a pretty high standard.

So, Marta Maria Casetti, well done!

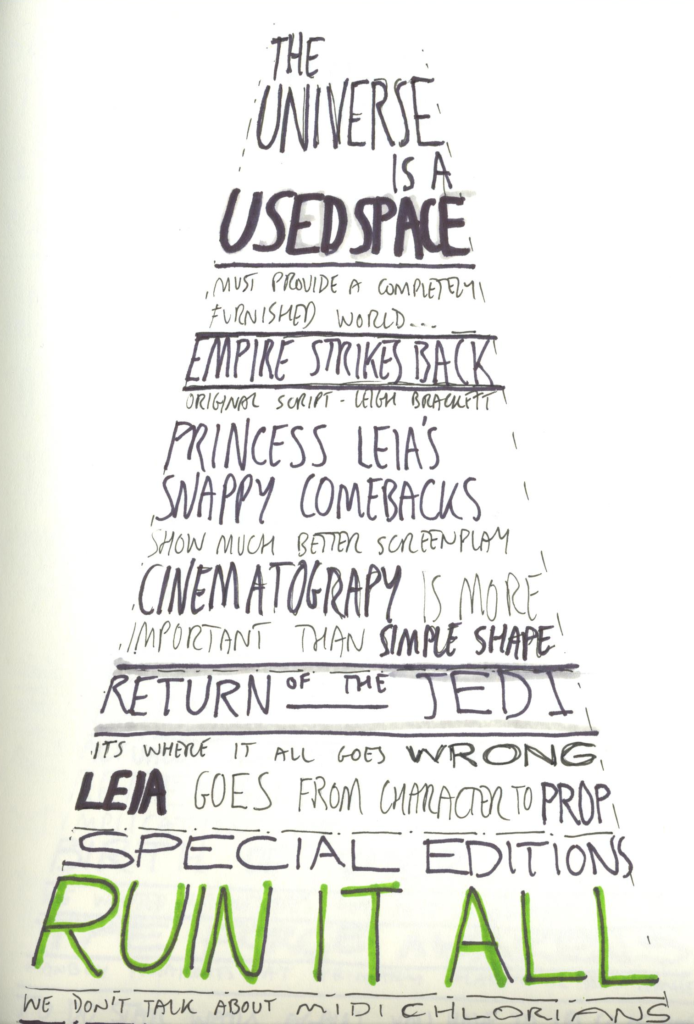
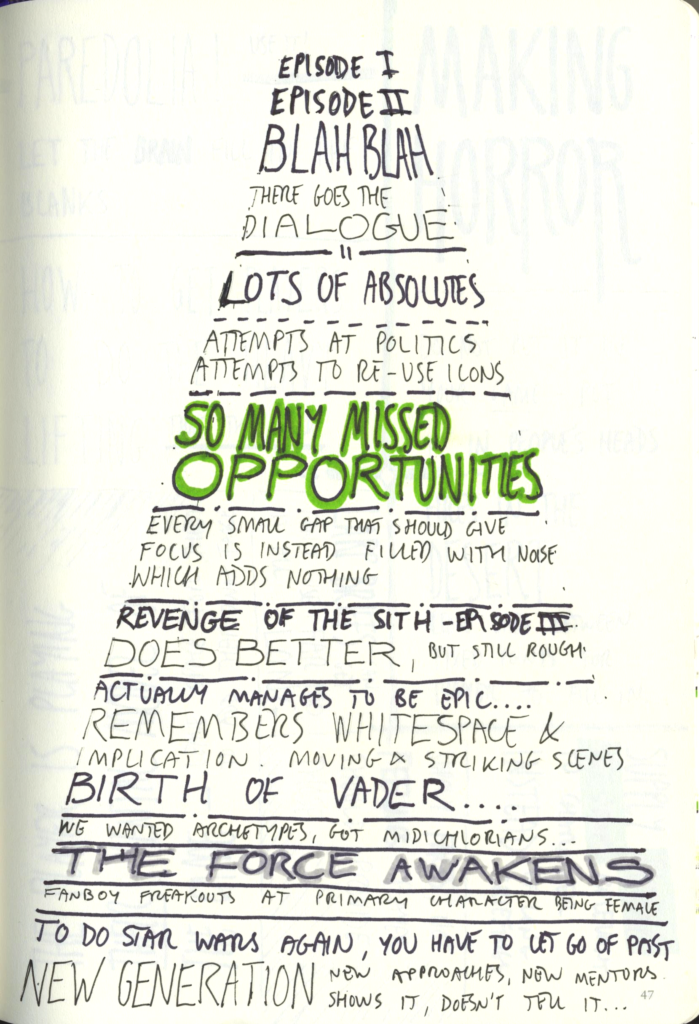
It’s also stuck in my head pretty well as I planned to do a single page of notes, and so settled on a layout and theme with that in mind… and then had to repeat it in a hurry as the notes flew out onto the pages!  In fact, I was too slow with the pen to get a fourth page set in time to cover Rogue One – which was also discussed in the same manner.

Scanned sketchnotes from "Watching a Galaxy Far Far Away"

Sketchnotes from “Watching a Galaxy Far Far Away” (1 of 3)

Scanned sketchnotes from "Watching a Galaxy Far Far Away"

Sketchnotes from “Watching a Galaxy Far Far Away” (2 of 3)

Scanned sketchnotes from "Watching a Galaxy Far Far Away"

Sketchnotes from “Watching a Galaxy Far Far Away” (3 of 3)

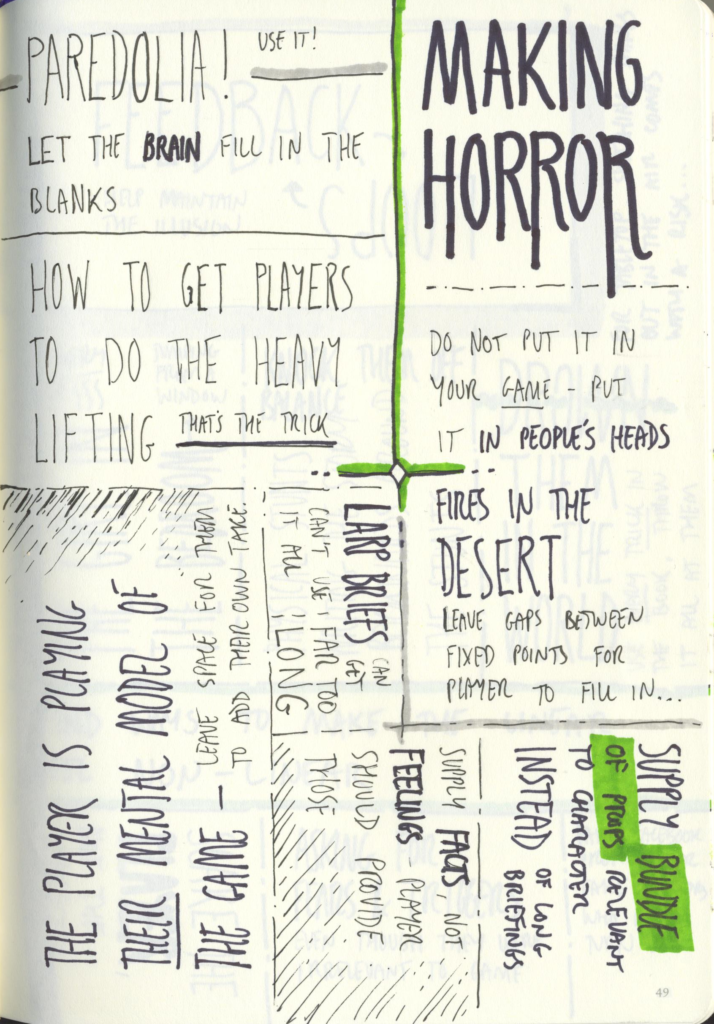
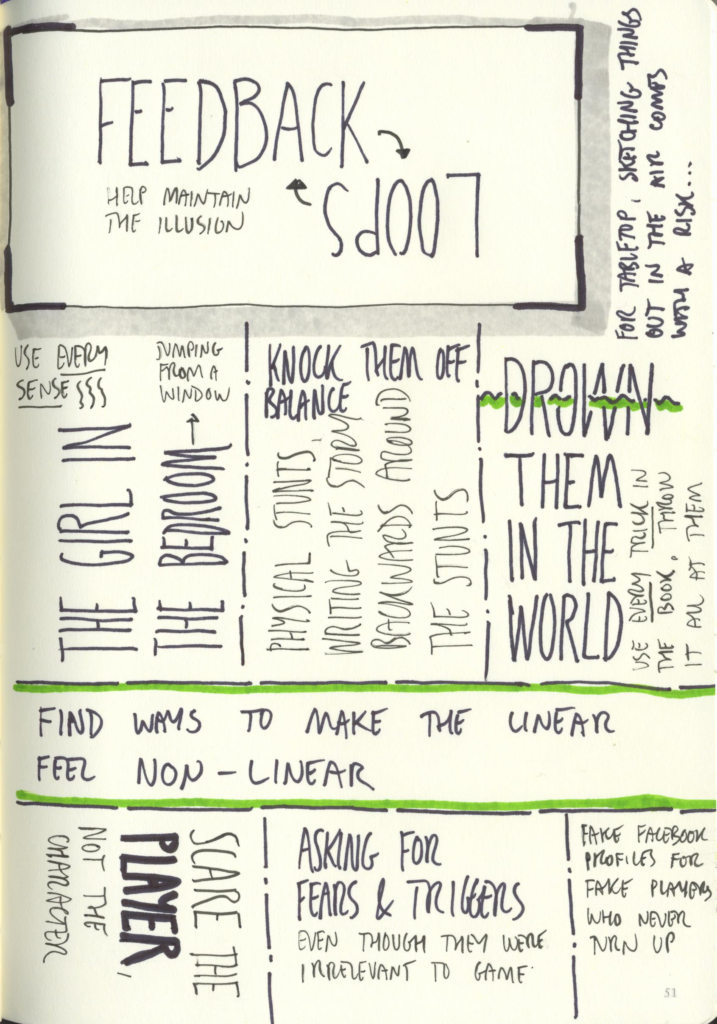
Making Horror – Hacking the Player’s Brain

A panel on techniques for making players experience horror in computer games, LARPs and beyond?  It’s like they saw me coming!

I’m going to let the sketchnotes speak for themselves here…

Scanned sketchnotes from "Making Horror"

Sketchnotes from Making Horror (1 of 2)

Scanned sketchnotes from "Making Horror"

Sketchnotes from Making Horror (2 of 2)

End of the Con

At that point, there were more things we could have gone to, but Katrina and I were both tired and had both just come out of panels we really enjoyed… so we decided to say a few goodbyes to folk around the con and start our journey home.

Going out on a high note was a better plan than trying to cling on the to the very end, especially as the next slot looked slightly sparse for both of us.  We’d both have been able to find something to hold our attention in the remaining few slots, but felt it was better to call it a day and brave public transport whilst still able to function.

Thus ended Nine Worlds 2017 for us. We’re already looking forward to Nine Worlds 2018, even if it makes the mooted move to Birmingham!


An annual games convention in the offing?

Over-The-Hill-CON

A few days ago, I was at “Over-The-Hill-CON” – a local mini gaming convention arranged (largely by my fiancé, Katrina) as a slightly late birthday celebration. We’d been far too jetlagged to organise it around my actual birthday, having just got back from 3 weeks trailing around New Zealand… so it was about a month later instead.

As an event, it was a huge success.  I also thoroughly enjoyed running one of the RPGs and facilitating another. We had roughly 35 people across two rooms, with one room purely RPGs, the other mostly tabletop gaming with a bit of RPGing.

What follows is a bit of a roundup of the day from my perspective… and some thoughts around the idea of making it a regular event.

Continue reading

How far is too far for a good game?

KapCon 24 in Wellington was, at roughly 18,800 kilometers, probably the furthest I’ve travelled for a spot of gaming, given than I’d have to leave the planet to go further (or find a convention in Dunedin or Christchurch, which are technically further).  I’m game for going further, but I suspect budget and convention availability would be a hindrance.

This was my first KapCon (but not K’s – she’s a regular) – and I enjoyed it immensely. I’m unlikely to be there every time as it’s a bit far to go… but I fully intend to go again.  If the logistics were easier, I’d even be interested in having a crack at running games (hell, even getting involved in helping with the flagship LARP – that kind of thing is in my wheelhouse, after all). Next time I come along, I’ll certainly have a crack at running something, though.

Continue reading

London Indie RPG Meetup, December 2012

The Meetup

I thought I’d talk about gaming. Specifically roleplaying. Partly because it’s always been an activity close to my heart, but also because I’ve actually done some of it again for the first time in… far too long. For somebody who still identifies himself as a roleplayer, I’ve done precious little actual playing lately.

My girlfriend has been going to the London Indie RPG Meetup for a while, and it’s had my interest too.  I decided that I’d skip out of another regular SF meet I go to along.  It’s annoying that they clash, but what can I do!  I’m extremely glad I did, as I got a chance to not only play a rather cool new game, but I also got a chance to try out my first go at a GM-less RPG.

Continue reading

How to use my holiday

I’m stressed, I’m tired, I’m having a bit of a run of insomnia (although I seem to be getting clear of that now). I’m also getting that “outsider” feeling again.  So I think I need a holiday.

Conveniently, I have one coming up.

Two weeks in a secluded mansion house in Devon with a bunch of friends.  I’m really looking forward to it.  I’m also toying with trying a few experiments whilst I’m there.  Nothing particularly shocking, but things that may be interesting all the same.

First, I have a couple of development projects I want to try, and which I might be able to convince a couple of people to experiment with in a “we’re shut in a house in the rain” kind of a way.  With post it notes and everything.  More on the ideas shortly.

Second, I want to try getting back into RPGs after a couple of years away.  I have the germ of an Unknown Armies game, and I have a hankering to try “Don’t Rest Your Head” as well.  I might have to give one or both of those a shot.  I want to specifically ask for some feedback about the feel of RPGs before then, though, so I’ll get to that shortly as well.

Development Ideas

I have two main ideas for things I want applications for, and I lack the skills to pull them together in an amount of time that fits in my attention span.  So here’s the skinny:

Idea 1 – IC Computer Interface

The number of times I’ve been in a LARP and we’ve had computers as part of the game is pretty high.  The number of times could have actually had a real, working computer present is also pretty high…  but the number of times we’d have been able to just let a player loose on it to see what they turn up is pretty damned low.

What I’d like to do is come up with a styleable, themeable application that could run on a standalone device (laptop booted from a USB stick, Raspberry Pi, etc).  Something that would let GMs pick a rough interface style, seed it with some data for the players to find, or some “enable / disable” type controls.  Something that could be used by a GM to easily mock up the relevant parts of a computer inferface and populate them with data, and then procedurally generate a pile of crud and chaff around it.  Ideally without having to install anything on the PC being used (hence the USB boot / live install / VM approach).

Passwords and codes could be supplied to players based on their characters’ skill levels, and then used to bypass security, or even just run some simulated “cracking tools” that run for a duration based on a skill check and then spit out hidden info or unlock hidden areas.

It makes sense to me to create a basic framework for this kind of thing, and I can see it being a cool development project for a couple of interested parties.

Idea 2 – Game Journal & Planner

I’ve never been as comfortable running a LARP as I was when I could use Grapevine.  More than just a character sheet tracker, this was a godsend for tracking plotlines and interactions.

But it was WOD specific and is also dead as a doornail.  All the various successors have focussed on tracking stats, rather than on the relationships between characters, objects, events, rumours, plots, etc…  Relationships between what I call game objects.

I’d like to see a tool that helps game runners keep journals for each of those game objects, allowing them to keep a timeline for each object, and to easily relate those objects and timelines to each other.

Character sheet tracking holds little appeal to me, but keeping track of all the balls in the air in any given game?  That’s important.

RPG Question

I also mentioned that I wanted to get back into RPGs again, and mentioned UA and Don’t Rest Your Head.  These are both games with a certain element of horror to them, but they also both work best when there’s a frantic pace to the action.  A pace that’s often missing when folks actually try to play them.

It’s all too easy to let the pace drop , particularly when your players don’t really know the setting yet and so don’t know what is or isn’t possible.

I’d like to know if anybody has any thoughts on how to pick up that pace, and how to get all of the players into the right sense of freefall.  How to get them to react instead of thinking things through, and how to get a game in a manic setting to actually feel manic.

Any and all suggestions welcome in the comments!

Speak Out With Your Geek Out – LARP

In my previous post I got one of the more socially acceptable topics out of the way… so now it’s time for the full in the face, double barrel shotgun of geek:
Live Action Role-Playing, aka. Live Roleplaying, aka. LARP, aka. LRP, aka. Freeforming, aka. Freeform Interactive Theatre, aka. Cross Country Pantomime.

You might think I’m joking, but all of the above are names I’ve heard applied to the hobby.

Yes, on occasion I dress in silly costumes and run around being an idiot with weaponry. Yes, I am an adult. Yes, I have social skills. Yes, I can pass for a normal human being if I really chose to do so. I’d rather pass for somebody who’s prepared to do something a bit daft in the name of fun, though.

But it gets worse. I’m one of the secret elite – I don’t just play these strange costumed games, but I actually organise and run them too.
(note: not actually very secret, nor particularly elite)

I put time and effort into creating coherent settings and plots, then adjusting them to remain fun as the players go out of their way to do things I hadn’t expected or planned for. I have to think on my feet to react to their sudden and inexplicable plans. I have to try to keep pace and atmosphere whilst trying to work out what’s going to happen next after the players came up with a plan that’s so out of left field that it may well have started on another planet.

It’s a lot of work, coming up with a game that makes sense and where the players get to go through an emotional rollercoaster because of half imagined things that are going on around them. But it’s worth it. It’s a deep, engaging and frequently exhausting hobby – both physically and emotionally.

I get a kick out of it because, when I’m running games I have to stay one step ahead of the players to keep things entertaining and exciting… but it’s at it’s most rewarding when they get themselves one step ahead of me. It’s at those moments that I know the game has taken on a life of it’s own and the player are running with it. It’s then that I know they’re really into it, and I can feed off their enthusism… putting it back into the game to build in more barriers for them to break down before bringing the story to a fulfilling conclusion.

I get a kick out of seeing everyone involved get invested in the game. The way that people’s characters grow and gain stories that can be told again and again as the years go by. I like the way that even when a particular game was years ago, the stories can carry on and grow in the telling, becoming modern epics in the world of LARP. Those stories can be told by people who’ve never met the people involved, spread by word of mouth across campfires, whispered from vampire to vampire in a gothic mansion or spoken of in hushed tones in the foxholes of the forgotten battlefields of the 41st milennium.

It’s a hobby that makes people think on their feet, and it makes people look at things from different perspectives. You can throw people into experiences they’d never meet in real life and, between everyone involved, build a story around it that they’ll remember for years. It’s also a hobby that, no matter how into it you get, you can never entirely take it too seriously. When it boils down to it, it’s fun – and it doesn’t take much at all to remind you of that, even when you just saw two of your friends cut down by an orc with an outrageous accent and green “skin” that’ll refuse to fully wash out of their hairline for days to come.

If you think this kind of thing is something people should keep quiet about and hide away from their employers, then I’ve got a suggestion for you: Quit whining, paint yourself green, dress yourself lie a mad-max reject, pick up a foam axe, a NERF gun and an atrocious accent and stop taking everything so damned seriously. Enjoy yourself whilst running around like a loon in the company of others. If that’s not your bag, how about putting on a regency dress (or doublet and hose) and spending a weekend drinking tea and gin whilst the lower classes outside your pavillion beat the crap out of each other for your pleasure. Cheer on your favourite ne’er do well if such things appeal to you.

Either way, there’s several thousand people in the UK alone having a great laugh doing this kind of thing. Why not give it a shot?

This is the second of my “Speak Out With Your Geek Out” posts. There will be more to come over the next few days.

Just popping out to the shed to commune with the machine spirits

A few months back I made a crack elsewhere about how you could tell I was a geek because I was going out to my workshop to program a LARP costume. It’s possible that people who don’t know me may have thought I was joking in some way. Foolish people. I don’t joke about such things! Well, okay, I might joke about such things… but hey, I was serious this time.

Death Unto Darkness – Event 4 – The Long Way Down

I used to dabble a bit with Warhammer 40,000 when I was a teenager and dinosaurs still walked the earth… and have recently found a rekindled interest through the PC game “Dawn of War“. On top of this, I’ve known a few of folks involved with the Death Unto Darkness live-action games for a while – some of whom are players, some crew. I’d even managed to find my way along to crew some of the previous games myself, where I died repeatedly whilst wearing a succession of foolish hats. This time, though, I was actually able to make the whole event.

I’d already been putting thought into how to create an Adeptus Mechanicus costume for a while. They’re a faction within the Warhammer 40,000 game world that I find quite interesting. So when I heard that they were going to be involved in the plot, it made my day. It meant I had an excuse to tinker with electronic gubbins even more.


The Core Idea

My initial idea was that I wanted to have a glowing powerpack mounted on my back, and that it should be resilient enough that I could bash it about a bit and light enough that it did’t restrict me too much. I didn’t quite achieve all of these due to time & money constraints, but I did end up with something that I think looked pretty cool.

Getting Started

First, I needed a base on which to start mounting everything. This needed to be something I could fix things too and strap on to my back, but it also needed to be something that was reasonably comfortable when I was wearing it. I looked at a few options, and even bought a cheap water-carrier rucksack as an option… but in the end I found an old rucksack in my wardrobe and used that instead. I’d had it for more than two decades, so it was starting to show a bit of wear and tear… so I figured this technological enhancement would give it a new lease of life.

This rucksack had a simple metal frame in it that meant it would keep it’s shape when I was wearing it, and the straps were good and sturdy without having too many extra fixings or doodads on them. So I just cut away the main “sack” part of it so it was just a nearly flat backpiece, the shoulderstraps and waist-belt. Because the metal frame was shaped to fit a back, rather than completely flat, I couldn’t just fix a lump of wood to it, so I had to attach three flat MDF sheets to it instead to work with the curve. Once these were fixed, I fixed the remains of the “sack” to the MDF as well, helping secure it to the frame.

I then sprayed the whole lot black, because “green and beige” isn’t a very techpriest colour scheme.

Electronic Bits – Prototype One

LEDs

Next up, I started to experiment with LEDs until I found some that were good and bright. After several false starts, I found I could get some from Oomlaut – not the cheapest, but they came with bundled with resistors to soak up some voltage… so I went ahead and bought a load to use. I’ve been back and bought more since for other projects, because I know they’re bright enough for what I want.

Test LED Array

For my prototype, I put together a test LED Array. This array was made up of 20 sets of LEDs and resistors – not the most efficient way – but easiest for me to put together with what I had. Basically, each LED was wired in series with a resistor, with the resistor making sure that the LED only had the right amount of voltage between it’s two legs. There’s some magic involving Ohm’s law and the LED specifications involved in working out what resistor to use, but this probably isn’t the place for me to explain all that! It probably would have been better to use 10 sets of LED+LED+Resistor, but I wasn’t paying enough attention to do that properly at the time.

So anyway, I made 20 of those LED+Resistor pairs, then wired those pairs in parallel – this meant that each LED+resistor pair was going to be getting near enough the same amount of voltage…

Transistors?

I also picked up a bunch of transistors to drive my planned LED arrays. I used some TIP-120 darlington transistors (or their equivalent – I can’t actually remember which I used) which were almost certainly overkill, but they did the job. I’ve always been rubbish at picking transistors, so I tend to go for overkill rather than efficiency.

For the uninitiated, I needed the transistors because the electronics I was planning to use to control this lot can only supply a small amount of current, and a bank of 20 or so LEDs will try and suck up more than that small amount, which, in WH40K terms, would anger the machine spirit. By using a transistor, I can use the controlling electronics to control the transistor instead – basically using it as an on/off switch for a source that can supply a larger amount of current. This means that the machine spirit in the controlling electronics remains happy, and will continue to do my bidding.

Testing

I tested this prototype initially by just hooking it up to a 5v supply to make sure it lit up properly. Sure enough, it did.

Electronic Bits – Prototype Two

The next step was making the LED arrays have variable brightness. To do this, I needed to use something called “pulse width modulation”, which is a fancy way of saying “turning it off and on again really, really fast”. You can use this to control the brightness of the LED by varying the ratio between “on” time and “off” time. Since I wanted this to be both variable and software controlled, it was time to break out the Arduino so I could knock something together quickly.

An Arduino is a handy little microcontroller board that you can program via a PC and then use independently. They’re really good for prototyping widgets and devices, and also good for where you want to knock together circuits where you don’t want to put time and effort into making a custom board.

For this prototype, I hooked one of my LED arrays up to the Arduino’s PWM pins, as this makes it really easy. The Arduino has 14 output pins, six of which are capable of provising pulse width modulation (PWM) out of the box, meaning that I just have to write a value between 0 and 255 to those pins, and it will use pulse width modulation to make it a value between 0v and 5v. So setting it to 255 gives 5v, setting it to 128 sets it to around 2.5v and setting it to 0 turns it off.

Sure enough, this worked just fine, and I could set the LED array to whatever brightness I fancied. I also confirmed the levels where it was good and bright, and where it was just too dim to be seen. It was never going to be really effective in full daylight, but indoors or in shade it stood out pretty well at anything above around 60% brightness.

Physical Bits – The “Glass”

The effect I was trying to achieve was that of a set of small glass panels in a gothic decorative frame, with the pulsing light of the “power unit” inside it. Handily I had some clear polycabonate around, which is pretty resilient stuff (they use it in riot shields, after all) so I figured it would be tough enough to survive being knocked about a bit in a LARP. I cut this down into three large sections and three small sections, which would be used to crea
te the windows in three panels joined by hinges, which I would then fix onto a shaped frame.

Because I knew that I didn’t want a clear view of my bad soldering through the windows, I sprayed the polycarbonate sections with a few coats of frosting. This wasn’t hugely effective, so I think I might look into using either privacy film or starch and tracing paper next time – it’ll probably be quicker and less hassle. I did experiment with engraving patterns into the window sections, but at the time I didn’t have a good set of engraving tools and it was going to take days to do… if I was quick. I considered panting patterns on the inside of the glass, too, but in the end I just decided to leave it plain – it worked okay without any extra decoration.

I then used various bits of plastic moulding and edging to create frames that the the polycarbonate sections could be securely fitted into. I then used upholstry strapping and impact adhesive to join the three panels together with a flexible hinge, so that I would be able to fold them to make the shape I wanted. At this point the construction was fairly loose, with the exception of the good and sturdy hinges, and could be pulled apart easily. So I added more upholstry strapping in various places to hold it all together. This was ugly, but it was on the inside of the “power unit”, so that didn’t really matter. It still wasn’t as sturdy as I wanted it to be, but to hold it together any more firmly, I was going to need to have the skeleton to fix in onto – I couldn’t make it tougher whilst it was still a separate piece.

Physical Bits – The Skeleton

To make the skeleton, I first needed to knock up a prototype to make sure I got the dimensions right. For this, foamboard is my friend. Conveniently, I still had loads left over from when I made Arty the Artifact for another game. For this prototype I made three trapezoidal “ribs” (one for each end and one for near the middle of the backpack) that the panels could fold around, and two end caps that would cover the top and bottom of the panels. When I’d made sure that the panels folded around them properly, I replicated these ribs from MDF. This was slightly more complicated as MDF is thicker than the foamboard, so the endcaps would have been too thick… so instead of having separate ribs and endcaps, I carved a step into the edge of each endcap so that they could double as the end ribs.

I them fixed these sections onto a backplate and started to attach the LED arrays.

Electronic Bits – Final Assembly

Fixing the LED arrays in was slightly harder than I’d planned for, as the ribs of the frame took up more space than I’d intended, so the LEDs were pushed too far forward, making them too close too the glass. Rather than living with this, I actually chopped them in two and replaced a bit of wiring with a longer gap. This meant that I could put the two halves either side of the rib, so they were set further back. It was hassle, but it looked much better for it.

Once these were in place, I drilled a hole in the bottom endcap for the wires, then drilled a matching hole in a pretty basic black plastic box and fixed that to the bottom of the backpack. Once that was in place, I pulled the wires through and tested that the arrays still worked. Once I’d confirmed that it was all working, it was time to put the window panels on, sealing the LED arrays in place.

Whilst I was doing this, I also wired in a third LED array, made from a modified head torch and the same transistor arrangement as above. Basically, this was 9 ultrabright white LEDs with a reflector. I fixed this inside the bottom endcap, pointing along the inside of the power unit. I decided I wanted this to add occasional strobing into the backpack rather than any fading.

My plan here had been to use the arduino for prototyping, then build a dedicated circuit… but I didn’t manage to maintain that idea in the end – just not enough time. For this kind of job, it’s a bit overkill to use one, but since I’m only going to get occasional use out of the thing, and can pull out the arduino and use it elsewhere, I decided to stick with it – although I did swap out the arduino for a cheaper arduino clone (a Seeeduino) rather than risking my main board.

Physical Bits – Enclosure

The first stage of this was simply to place the panels over the skeleton and get everything lined up. Which fitted pretty much perfectly first time.

The second stage was to glue upholstry strapping on the outside of all of the hinges and joins, but also to loop it around the whole assembly and fix it (with both staples and glue) to the outside of the backplate and endcaps. Once I’d done that, there was no way that it was ever going to shift again! Okay, so the thing looked like a monstrosity of black strapping and frosted plastic, but I already knew I was going to be fixing a protective and decorative layer on top, so I decided I could live with it.

The Software

Now that things were mostly built, it was time to deal with the software. What I wanted was for the backpack to pulse red whilst it was on, until I turned a keyswitch somewhere, at which point I wanted it to switch to fade across to pulsing green. I also wanted a way to undo that change so that I could move it back to pulsing red without having to power the whole lot down and start again. At this point I hadn’t wired in the keyswitch, but that didn’t matter very much. A switch is basically two bits of wire, and when you touch them together it’s “on” and when you separate them it’s “off” – so I just used two bits of wire for the time being. Good enough for me.

The tricky bit came because I wanted the change from red to green to be a smooth fade rather than a sudden switch… and because I’m picky like that, I wanted it to be a dipless fade. Usually, if you have two lights next to each other and you reduce the power to one at the same rate that you raise it to the other, what you’ll actually get is a dip in brightness, because they cross at 50% power on both, and 50% power rarely matches 50% brightness. In fact, I usually find that 50% brightness comes in at around 70% power, so that’s where I wanted the power levels to be even. If I was doing it properly, I’d have used two logarithmic curves to make the two meet at around the right spot… but I’m not quite that picky. Instead, I wrote the software so that it waited until the current pulse was at it’s lowest point, then it would fade the red up to it’s highest point, but also the green up to 40%. Then, it would use a linear fade to bring the red from 100% to 40% and the green from 40% to 100%, crossing at 70%. Then, it would fade the green down to the low end of a pulse, and fade the red out.

The result was that the power cell would pulse red, then do a pulse where it started red, crosssed over, then ended up green, after which it would continue pulsing green. It was then easy enough to tweak the code so that it could do the same going from green to red when the switch was turned off again as well.

I added in a few hard-coded pulses of the white LED array as well, so that there were some bright flashes at various points in the sequence.

I’m not going to post the code up here becuase it’s quite, quite horrific. It’s not difficult or complex – just bad because I was writing it in a hurry. One day I might replace it with something clever and efficient.

Electronic Bits – Mounting and Control

Once I’d got the software working enough to use, it was time to fit the Seeduino into its box and close it up, so I fitted leads for the keyswitch and added transistors to drive two more LED arrays (so I could add them later if I want to)… Then screwed the lid onto the box. I then ran those cables (with a couple of connectors on the way) round to the
waistband of the rucksack, where I fixed another black box. I then fitted the keyswitch in the faceplate of that box, and put the key onto a chain next to it, so I’d never be able to lose the key without losing the whole backpack… which seems like an unlikely occurance.

That meant that all of the technical bits were done, so it was on to the finishing touches.

Physical Bits – Padding and Decoration

At this point, the backpack “power unit” was a bit fugly, being clad in glue and upholstry strapping. Whilst it was pretty resilient in this state, it still had a few solid edges that could damage other people’s kit if they hit it. I had no concerns about it taking damage, but LARP weapons hitting it may have suffered damage… so I wanted to soften the edges up a bit. I wasn’t planning on repeatedly beating people with it, though, so I didn’t need to go the whole hog… I just needed to soften the edges, make it look good and make it able to take a couple of knocks.

What I ended up doing was making a foam decorative layer, which was coated in latex and painted bronze on the front and edges. When this eventually all dried (which took about a day and a half), I coated the outside in clear varnish. I didn’t have time to let that lot dry completely, as it was still tacky two days later… so I pressed on and glued that lot on top of the strapping with impact adhesive.

Then, the finishing touches. Going in with a fine paintbrush and filling in any unsightly little bits of visible white plastic moulding with black paint. I still missed a couple, I think.

How did it handle?

All in all it worked pretty well. I had a couple of issues with wiring around the battery as I hadn’t had time to add a proper power switch or put any kind of boot onto the power leads, so I sheared off the wire to the battery connector at one point. I replaced it easy enough when I found a screwdriver, but it could do with some sturdier cabling and some work to make it a bit more resilient in future.

You can see what it looked like here:

Edited to add: In this video I talk about estimating the battery life being 6-10 hours. I’d miscalculated. A more accurate estimate is 12-16 hours on a single Lithium PP3.

Future Plans

  • Make use of the two extra transitors and cabling I added to put some LEDs on the front of the costume somewhere.
  • Rewrite the software with less horrible code.
  • Make the software more versatile, maybe adding more control to the inputs.
  • Make the white LED array independently controllable, and able to do continuous strobe flashing at a controllable rate.
  • Improve the sturdiness of the wiring around the power connector.
  • Tidy up the mounting of the seeduino in its box.
  • Add a usb connector to the box so I don’t have to open it up to change the software
  • Improve the non-techy bits of the costume to go with it

LARP and the User Experience – Part 3

Introduction

In the previous post I discussed how the UX techniques of User Archetypes and Personas could be applied to LARPs. This time I’m going to follow on with a similar approach – showing how User Journeys can be applied to LARP. Again, these will be of more benefit for larger games, although smaller games might also benefit from thinking about them.

User Journeys

Picking Goals

User Journeys are a technique used to determine what a user must go through to reach their desired goal.

In general, they also keep in mind the business goals of the product being designed – if the user goals and business goals don’t meet up, then the business isn’t likely to do well. To put it simply: If the business doesn’t help the user meet their goals then they won’t get or keep the users, and if the users don’t act in a way that gives the business what it needs to succeed… then it won’t.

When creating user journeys, you usually do so with a particular user goal and a matching particular business goal in mind. This pairing of business goals and user goals is a way of ensuring that the business benefits from the customer having a good experience, rather than the two being at cross purposes.

Working through an example of this in a LARP context, we’ll work through an example with the following goals:

  • User goal – “I want to enjoy my first game”
  • Business goal – “We want to increase our regular player base”

The user goal implies that a player wants to get to their first game and have a good time. The business goal implies that the people running the game want the player to get to their first game and to keep coming back for more. These two goals work together, and having both of them listed keeps it clear why the business should be interested in the user’s goal.

Who’s on the Journey

In the previous post I discussed archetypes and personas – these are ideally suited to the process of putting together a user journey. In this instance, the obvious persona to pick up on from the last post is Fi the First Time LARPer, although she’s not the only persona that applies here. Any of the player archetypes I listed in that same post could be relevant, and should have personas created for them an a user journey created for this pair of goals. The other personas would be relevant because whilst they may be long established LARPers, they may not have played this LARP before, and so can be “first timers” in that sense.

That said, for this example, we will focus on Fi for now.

What needs to happen for Fi to achieve her goal?

Several things need to happen for Fi to enjoy her first game – some of which she knows about already, and some of which she doesn’t. I’ll try to list a few of them below. I’m assuming that this is for a larger weekend event that involves travelling and camping overnight. Below is a non-exhaustive list of things that need to happen (or not happen), placed in something near to the order in which the needs should be fulfilled. These needs may not apply to all games, and the order may differ widely, but this seems to make a kind of sense.

  1. She needs to know about the game (we already know from her persona that she”s heard about it via word of mouth from friends)
  2. She needs to know what kind of game to expect
  3. She needs to book a place at the game & pay for it
  4. She needs to generate a character
  5. She needs to get to the game and onto the site
  6. She needs to get to her campsite and get her tent set up
  7. She needs to get into costume
  8. She needs to be able to buy things she needs that she didn’t think to bring
  9. She needs to sign in and collect any special ability related paperwork or props
  10. She needs to start playing
  11. She must get involved in the game
  12. She mustn’t get sidelined by more experienced players
  13. She mustn’t get lost in the rules
  14. She must be able to find her way around the site
  15. She mustn’t be horrified by the on-site hygeine
  16. She needs to eat and drink enough
  17. She must get the amount of sleep she wants
  18. She must always be able to find something to do
  19. If she is injured, she must get prompt, appropriate care
  20. If she decides to return, she’d like to be able to buy her own equipment and costume

That’s far from everything, but it’s enough to be getting on with. Now that we have these, we want to tell a story of how we’d ideally like Fi’s event to go. There are a couple of ways that I’ve used in the past to do this, one of which is telling the ideal story and comparing it to reality, the other is to tell the woeful story of the worst experience, and then identify the places in that story where it all goes wrong and how to prevent them.

In either case, working through the story can be done by just one person, but you’ll get far better results if you tackle it with at least two. With two people, you can make use of a tabletop roleplaying approach. One of you picks up Fi’s persona as if it was a character sheet, background and brief, the other takes on the role of GM, providing responses to the player’s actions and placing appropriate barriers or constraints in her way to make sure things are realistic. The GM also needs to ensure that the player doesn’t “cheat” by using knowledge that Fi wouldn’t have – using out-of-character knowlegde when taking a persona through a user journey is frowned upon just as much in user experience design as it is in gaming!

Finding Fi’s Ideal Story

The ideal story is trickier than it sounds, as you have to make sure all the bases are covered, and that the protagonist never achieves things by magic. In this approach, the GM needs to be firm but fair – they need to make sure that things stay realistic and that people don’t skip over the dull bits – if there are dull bits, you need to know and understand them so that you can stop them from being dull.

Using Fi as an example, in the ideal story she needs to achieve all of the goals listed above. Looking at goal 6 from the list:

  • She needs to get to her campsite and get her tent set up

This seems straightforward at a glance, but the last goal she achieved before that (goal 5) was just to get on to the site. There’s a fair few gaps that need to be filled in between achieving that goal and having her tent set up…

  • How does the friend who drove her to the event know where to park?
  • How does she know where she’s camping?
  • How does she know how to get from the carpark to the area where she needs to camp?
  • How does she get her stuff from the carpark to her camping area?
  • Once she’s at her camping area, how does she know where she should pitch her tent?

Filling the Gaps

All of the questions above need to be answered before she can move from the state where she’s arrived at the site to the state where she’s pitched her tent. There’s undoubtedly more such questions, but these are enough to use as an example. There needs to be a good, reliable and resilient system in place to ensure that all of these questions are answered. The questions about where things are and how to get between them can be answered on a basic by good maps and signage, but human beings on hand to direct people… particularly as the answers may depend on knowledge that Fi doesn’t have yet.

As an example, at larger fest
events there are often multiple camping areas on a huge site, with different player groups camping in different places.

A map showing which groups are camped where doesn’t help if you don’t yet know which group you’re with. The chances are that Fi is camping with her friends and that they will know which group she’s with, so they would be able to fill in that blank. If we diverge slightly from the persona, though, and treat her on her own, she may not now what group she should be with. In that instance, she’d be lost without being able to find out which group she should be with. A marshall would be able to help her check her character details and work something out, further improving her experience. Likewise, if she didn’t have her character details to hand (if they were packed in a rucksack, for example) then a marshall with a radio would be able to call into the operations desk and ask them to look up her details.

This leaves us with four ways to help bridge those geographical gaps:

  • Map – Helpful if you know what your aiming for, but requires you to have the map with you at the time! Can show anything of significance
  • Signposts – Helpful if you know what you’re aiming for, does not require you to be carrying anything. Can’t signpost everything.
  • Marshall – An obvious member of staff who can help direct people to where they need to be. If the player doesn’t know where they need to be, they can help work it out. Obviously, this only works if the player can find the marshall.
  • Marshall + Radio – As above, but backed up by extra information and resources from the operations desk / game organisers.

For the logistical question of getting her stuff to the campsite, Fi doesn’t have much stuff, so she can carry it. However, what if she’d twisted her ankle on a dodgy kerb at a service station on the way, and so didn’t want to carry her bags and a tent? At smaller events she can just ask somebody or get her friends to help… but at larger events it’s not uncommon to have some kind of transport assistance on hand – a quad bike and trailer service (or at least handcarts) are often available for a small fee, although you frequently have to queue for them.

  • Handcart / Other Transport – As long as you know it’s there, luggage transport can be a benefit for people who can’t carry their belongings to camp, if they’re prepared to wait a bit longer and know were to queue.

Then the final logistical gap to be filled is how to work out where to pitch your tent. Again, there are several ways to solve this, some of which are listed below:

  • Another Marshall – Who can explain the layout of the camping area and direct you to appropriate pitches
  • Campside Map – More detailed than the main map, a campsite map on a noticeboard near the area entrace could show the rough layout
  • Marked areas – Marking areas to be kept clear or areas specifically for pitching tents will help show people where they should or should not go

This all covers how Fi can get from goal 5 to goal 6.

An Excerpt from Fi’s Ideal Story

Given the above, part of Fi’s ideal story could be as follows, with the things responsible for filling gaps marked in bold:

“When we arrived on site, the marshall (with radio) at the main gate (Gate A) checked our tickets and marked us off on a list. He said he could check us off with some ID instead of the tickets if our tickets were packed in the boot. He handed each of us a booklet with a map and a few extra guidelines about the site. He also pointed the carpark out to us, and the entrance gate (Gate B) that we’d need to go through when we’d parked. He also said that if we needed help with luggage, we could queue at the sign by that gate for assistance from a guy with a quad-bike and trailer. We weren’t going to need it, but it was good to know it was an option, in case I need it next time I come.”

“When we’d parked, we got our stuff out of the car and headed for the gate. The marshall (with radio) at Gate B asked us if we knew where we were going… when we told him we were camping with the Weasels faction he quickly pointed the route out to us, and mentioned that it was signposted, so we should be fine. He also made a joke about hoping we had a good night’s stealing and backstabbing… to which my friends jokingly replied that honest Weasels would have no part in such things. It wasn’t much, but it helped put me at ease.”

“It didn’t take long to follow the signs to the camping area, and when we got there, we found a map on a board just inside the entrance. It showed us that the area nearest the camp entrance was an “IC” area, which apprently means that any tents within it are In-Character, and that we should only camp there if we’re comfortable with that and can make our tent look like it’s in keeping with the setting. We only have a modern dome tent, and this is a fantasy setting, so that wasn’t for us. Further back in the camp is Out-of-Character, so anybody can camp there, and further back, the other side of a clump of trees was a small quiet area for people with children or who were likely to want an early night. The map also showed where we needed to keep access routes clear, and told us they’d be marked with rope fences. Whilst we were looking at the map, another marshall came up and asked if we needed anything – we didn’t, so we went and pitched our tent in the Out-of-Character area.”

This covers from Fi’s arrival on site to having her tend set up – which is often an area of planning that’s forgotten about as effort tends to be focussed on the game itself.

Comparing to Reality

The next step here would be to see how much the reality diverges from this… At a large fest event, if there is no indication of what somebody arriving on site should do next, newcomers are going to get a confusing and disconcercerting first experience of the event. This could put them on the wrong foot and spoil things for them – being in a new environment and having no idea what you’re supposed to be doing is never a good place to start.

The list of things that fill gaps up above (the things in bold in the story) are all things placed into the environment by the organisers, and it could be considered that they are all affordances, suggesting forms of interaction to the players, whilst simultaneously suggesting what form that interaction will take and what the result will be:

  • Maps – A map invites the player to view the map, which affords geographical knowledge
  • Signposts – A sign post invites player to follow the sign’s direction, which affords a route to the indicated destination
  • Marshall– The presence of a clearly identifiable marshall invites player to ask questions or seek assistance, at which point the marshall affords personalised knowledge pertinent to the question
    • Radio – The radio is an affordance for the marshall – it invites the Marshall to communicate with operations, affording deeper knowledge about the player or situation
  • Handcart / Quad-Bike & Trailer – Invites players to place baggage in cart/trailer, affording painless transport of luggage to camping area
  • Marked Camping Area– Invites players to camp within the area, affords knowledge about permitted camping areas
    • Rope Fences – The rope fences are at once an affordance and a constraint – In this instance, they’re more of a constraint, as they mark areas to avoid.

On
ce you’ve got these worked out, you can see what you’re missing, what the problems are with providing them, and think of ways around those problems.

For example, maps are easy enough to make, but you need to be able to produce enough of them… which means either knowing your numbers, or having the means to produce them on site. If you can’t do that, then having master maps with “you are here” markers at key locations could be an acceptable compromise. If you have no maps at all, then you will have to accept that wherever one of your user journeys (not just Fi’s journey) relies on a map, that part of their experience will not meet expectations. You’ll either have to accept that shortfall or find another way to make that experience work.

Signposts must be planned for and created ahead of time, but you only need to put them on junctions of major paths around the site, so not that many are needed. You also need to be able to securely mount them in some way, which may not be possible in some locations, or the signs may be vandalised or stolen. If, for some reason, you can’t use signs, you’ll need to find other ways to replace them or remove the need for them in each user journey.

Marshalls require human beings to stand around waiting for people to need assistance, and it’s not always the best job in the world. They’re also usually volunteers, and you can rarely get enough of those. If you don’t have enough people, could you make do with less, with some kind of schedule to make sure that one of them visits each location where they are needed every few minutes? Or is there a way you could recruit and train more – perhaps a way to reward them for their assistance? Radios have an associated cost and as such it’s unlikely that every marshall will have one – you need to find a way to spread the benefits of those radios around to make sure that no marshall is left unable to get assistance. Likewise, marshalls need breaks from time to time, and need something to do when nobody needs help – these are things that you need to consider… but the user experience of game crew is something I plan to cover in a future post.

Luggage transport assistance – whilst it’s not uncommon at really large events, it’s virtually unheard of at smaller games. If they have it at all, it’s usually on an ad-hoc basis, asking for volunteers to help – and those volunteers may resent it if the game doesn’t benefit in some way from their work. If assistance isn’t provided, it’s probably worth making sure people know how far they’ll need to carry stuff, and that they can’t drive right up to their tent… and that if they have specific requirements, to get in touch. That way you discourage people from bringing unncessary luggage that they’re not prepared to carry for themselves, whilst letting people with a valid need for assistance know they can get it by asking in advance.

Fi’s Tale of Woe and Despair

This approach can sometimes be bleak, or sometimes hilarious… it all depends if it descends into farce or into tragedy – and you don’t always know which it will be when you start. In the previous approach, the GM was firm but fair – striving to keep realism whilst letting the player progress. In this approach, the GM is a dick. Their aim is to make as much go wrong for the persona in question as possible. Everything that could go wrong for the persona should go wrong.

Sometimes, the persona won’t even survive the story, and sometimes they’ll effectively write themselves out of it by severing their involvement with their experience. When that occurs, you can identify what lead to that departure, and what the minimum changes would be to keep them in the story instead. If the “Fi” Persona is being put through the “first game” scenario above, failing to achieve the first five goals would result in her never arriving at the event, so in this instance we work out what the worst experience would be that still resulted in Fi reaching the site, and pick up from there.

As a result, we sum up the situation at the point that

“Fi the First Time LARPer’s friends have talked her into attending a game. They’ve managed to sell her on it by saying how much fun it is, but they’ve not really given her much detail about what folks actually do when they’re there. They’ve just said ‘you’ll pick it up’ and left it at that. After a lot of hassle, she eventually managed to book a spot and pay for it, which didn’t fill her with confidence about the event… but she’s paid now, so can’t afford not to go. Her friends wrote some skills on a bit of paper and told her that’s what she should play. She doesn’t really know what much of it means as the rulebook may as well have been written in martian. She arranged to get a lift with Bob the Bastard – a friend of a friend who she finds a bit creepy. He kept touching her knee with every gear change on the drive up, and they ended up having a blazing row about half an hour ago – and have driven in stony, awkward silence since. They have just, at long last, arrived at the main gate to the site – several hours late and in the middle of an epic thunderstorm.”

Having set the scene, we can now continue with Fi’s horrific first LARP experience.

“In the dark and the rain, Bob couldn’t really see where he was driving, and the ground was just slippery mud anyway… and he couldn’t actually get to the carpark. He ended up driving into a ditch, leaving the car halway onto it’s side, with Fi’s door against the bank. She had to clamber over the gearstick and the driver’s seat to get out, and twisted her ankle quite badly in the process. Whilst she was climbing out, Bob was getting stuff out of the boot. He was carrying his stuff, but anything of hers, he was just dumping on the wet, muddy ground. When she’d eventually got out of the car and onto her feet, Bob was already marching off in an angry huff, locking the car remotely as he went – leaving her in tears by her wet belongings”

“Fi grabbed what she could of her stuff, but with her twisted ankle she really couldn’t carry all of it, so had to leave some of it. Some of it had already been blown down the track towards the carpark by the howling gale anyway. She tried to follow after Bob, but he didn’t wait for her, and the rain and the dark meant that he was soon out of sight. She tried to find somebody to help her out, but couldn’t see anybody around, so she kept on hobbling through the rain in the same direction until she eventually found some tents.”

“She didn’t know where she was supposed to pitch her tent, but she could see some people around a fire under a canopy further into the campsite, near some fancy looking tents. Figuring they must know something, she headed their way to ask for help, only to be told ‘Can’t you see we’re in character? Fuck off!’. Having run out of tears and feeling alone and unwelcome, Fi went back to an empty patch amongst the tents. She figured that she’d be able to put her tent there now and move it in the morning if she needed to. Of course, putting the tent up in the wind and the rain isn’t easy, and it’s worse with a twisted ankle. Fi eventually managed to get it close to erected, but she was pretty sure it wasn’t up properly – it kept flapping about in the wind and didn’t look very sturdy. It was also soaking wet, both inside and out. Nevertheless, it was up, and she just wanted to go to bed and for the day to be over, so she went inside with what was left of her stuff.”

“Alas, it turned out that it was her sleeping mat that she’d seen blowing away down the road, and her sleeping bag was soaked through and unusable. When she found her phone, she found she had no battery charge left. In the cold and the wet, she changed into some of the dryest clothes from her bag and wrapped herself in the rest before settling down to cry herself to sleep.”

“It was a broken nigh
t’s sleep, being periodically woken by the cold, the tent flapping about in the wind or just by noise from outside. Close after dawn, Fi was woken by somebody shaking her tent vigorously. She felt drowsy and confused, and couldn’t stop shivering, but she got out of her tent to talk to him. There was a guy standing out there with beercan in his hand telling her she couldn’t camp here, and that she had to move her tent as it was blocking a path. She tried to ask him where she should go to, but he just told her (in a drunken slur) to go and ask at ‘Ops’, whatever that was. She asked him where that was, and he got angry and just started unpegging her tent and shoving it with his feet – she tried to stop him, but he was drunk and belligerent and wouldn’t stop until it was clear of what she could now see was a poorly marked path between the tents. “

“When he’d gone away, she set about picking up the remains of her tent and her belongings. By this point she was just too miserable to want to even talk to anybody else, so she hobbled off with her belonging cradled in her arms, and tried to set up her now broken tent away from everybody. It didn’t go up properly, but it was enough that she could climb into it and lie down again, so that’s just what she did, to shiver the day away.”

“Eventually the rest of her friends went looking for her. The search party found her a day later, starving and suffering from severe hypothermia in the remains of her tent. She was in hospital for some time after that, and hasn’t spoken to some of her friends since. She’ll never LARP again.”

It’s a bit over the top, but it shows how easily a few setbacks can snowball into the worst day ever. It also gives an idea of what the effects of a bad experience can be, and what can contribute to making things worse. It won’t be an exhaustive list, but it will show you where you need to pay particularly close attention, and where you might want to have measures in place to try to salvage an experience.

In this instance, Fi failed at goal number 6. She got her tent pitched, but never managed to get it placed appropriately and never proceeded beyond that point.

Where did it go wrong?

Where didn’t it go wrong. However, there are a few key issues that kept coming up, most of which were aggravated by further issues.

  • Poor provision for bad weather. The thoroughfares of the site were not safe to traverse in poor weather, and there was nothing around the try to rectify this or provide alternative routes. This lead to Fi injuring herself upon arrival at the site.
  • No visible staff. The fact that Fi couldn’t identify the staff meant that she couldn’t ask them for assistance
  • Arsehole players. This isn’t something that game organisers can easily fix, but they can certainly work to create a more welcoming environment, or to reward or recognise people who take a bit of time to make the game better for others.
  • Isolation. Fi knew several people on site, but had no means to find them. The one person she did know abandonned her with no information about what she needed to do. After a few interactions with other people, she further isolated herself to avoid any further interactions.
  • Lack of information about where to camp. Fi ended up in a different camping area to her friends, and camped in a poorly marked thoroughfare – both purely due to lack of indication of where she should or should not camp.
  • Illness & Injury. Fi was injured early on, and no staff or other players spotted it or helped her in any way.

What could be done about any of that?

The biggest part of this exercise is to try to find ways around those key issues. It’s not always going to be easy to do so, but it’s important to work towards fixing them. Some examples would be as follows:

  • Ensure that there are game staff available, and that they are visible
    • Particularly ensure that the gate is always either manned, or that there is information there on how to find staff – if new arrivals can’t find staff they
  • Reward or recognise players who give some of their game to help newcomers
  • Ensure that camping areas are clearly identified
  • Educate staff (and possibly players) in identifying people who are in distress and providing at least basic assistance

Which of these approaches should I use?

Both have their advantages and drawbacks – the first gives you and idea of what the steps are along the way, and an idea of what can help you make those steps smooth, but it doesn’t really give a good picture of what happens when things fall down. The second gives an idea of what can occur with a specific set of issues, but doesn’t cover all potential issues – just the ones you think of at the time, which is never all of them.

If you’re looking to design the best experience, the first technique is good. If you’re trying to identify which problems are worst, then following up with the second can be highly beneficial.

In either case, you need to make sure that you work through the journey with multiple personas – not just the one. This could be done either as individual efforts, or with an “adventuring party” approach, with a group of different personas. This latter approach can also help you identify where different personas may be expected to support or hinder each other.

Did you notice…?

Neither of the user journeys above ever touched on the game itself. Both stopped before Fi ever got into character and timed-in at a game. That’s a different topic, and is likely to be the next topic in this series of posts – along with using User Flow Maps to map out less linear courses of events.

Feedback?

Any feedback, observations or ideas? Feel free to get in touch and let me know. Discussion of the topics I raise helps a lot when it comes to writing the next article!
LARP and the User Experience – Part 2

Introduction

In my previous post I briefly discussed the idea of personas and how character sheets can shortcut their creation. Well, having opened the can and found that worms were being strewn liberally all over the comments over on my LJ, I thought that’d be a good topic for part two!

One of the things I failed to be clear about is that these techniques are not intended to be used to make plans for an existing individual player. What they are intended for is when you are trying to plan for players or potential players that you don’t yet know and are not necessarily able to talk to, using information gleaned from players that you do have an existing relationship with. This might occur either:

  • When you’re starting a new game and have a core of interested potential players that you know well, but when they are going to be supplemented by a collection of further players that you don’t know.
  • When you have a larger game and don’t get the chance to interact with all of your players on a regular basis, and want to get an idea of how they might behave and what they might want based on the behaviour and desires of the players you can make contact with.

For smaller games, they’ll be less useful… but for larger games (or gaming organisations) they should help the people running the show to remember not all players are like them, and help them plan for players who are different.

With all of that in mind, the natural place for me to start here (since I seem to be talking more to a LARPer audience at this point) is to talk about the tools and techniques I work with in the day job to understand users, and then to explain how I can see these techniques being useful to LARP. I’ll also add in some tools and techniques I really should use, but don’t always get the chance….

It should be noted that I don’t use any of these tools in isolation as no single one of them gives you a full and clear picture. Instead I tend to mix and match in ways that are appropriate to the task in hand.


User Archetypes

User archetypes are rough outlines of “kinds” of user. They details what those people are like, what they might want to do and what resources they have available to them.

User Experience Design

I usually start by identifying a selection of key types of user – for example, in my professional life I might have the following:

  • Business buyer – This is kind of person who is given the task of buying in a product to meet specified needs. They’re never going to use the product, but need to understand that it meets those needs. They have budget available to buy a product.
  • Technical buyer – This is somebody who has a need of their own, and has the budget to buy a product to meet it. They may or may not use the product directly, but they understand the issues involved very deeply.
  • Administrator – This is somebody who will set up the product so that others can use it. They’re likely to work with it to configure it and test it, but are unlikely to use it in anger.
  • Occasional user – This is somebody who has access to use the product, but will only ever actually do so when they have a pressing need. They are likely to forget how it works between each use, and will start fresh each time.
  • Day-to-day user – This is somebody who is required to use the software every day to do their regular job. They are likely to know how to do what they usually need to do, and are unlikely to be stretched beyond that.
  • Power user – This is somebody who stretches the boundaries of day-to-day use, and actively seeks out new ways to benefit from the product. They are likely to experiment and try things that may break.

I actually have several more of these for the day job, and they’re named differently and much more detailed… but this gives you an idea. You’d usually generate these with a mix of pre-existing knowledge, and then flesh them out with a number of user interviews, which I’ll come on to later.

These are useful as a reminder that not everyone using the software is like you. They might only be seeing it because somebody is demonstrating it to them so they can buy it for their company. They might use it for a mere 10 minutes a month, but those 10 minutes might be the most panicked, time critical ten minutes of their working life.

If you’re aware of those different user archetypes, you can start to attempt to plan for them and design the user interface of your product to support their needs.

Once you have these archetypes, you can even work out some characteristics related to each of them. Using the above as an example, some characteristics could be budget, usage, product understanding

  • Business buyer – Budget: High, Usage: None, Product Understanding: Minimal
  • Technical buyer – Budget: Medium, Usage: Some (maybe), Product Understanding: Some
  • Administrator – Budget: None, Usage: High initially, then low, Product Understanding: High
  • Occasional user – Budget: None, Usage: minimal, Product Understanding: Minimal
  • Day-to-day user – Budget: None, Usage: High, Product Understanding: Medium
  • Power user – Budget: None/Low, Usage: High, Product Understanding: High

When you’ve got those characteristics, you can even explore further to see if there are any archetypes you are missing by combining characteristics in different ways. Many combinations won’t be relevant, but occasionally you’ll be able to think of a user archetype that you hadn’t previously considered.

Where this could be useful in LARP planning

Not all players are the same. Different players enjoy different things in a game, and may enjoy different levels of engagement. As an example, there are a lot of derogatory terms around for different styles of play – rules lawyer, primadonna, mother-hen, combat wombat, etc… None of which really help very much when it comes to constructively addressing what people want from a game.

As well as different styles of play, different players want different levels of engagement. Some want to play every game that’s going, and spend every waking moment thinking about those games and discussing them with anybody who’ll listen. Other folks want to play a game once a month. Neither is wrong, but they need different things from their games.

My very first, rough stab at some archetypes for LARPers might be as follows:

  • First time larper – This is somebody who’d never larped before, and is either at their first event or about to be so. They’ve not done this before, don’t know the rules, setting, conventions or terminology.
  • Casual larper – If they’re free and there’s a game on, they might turn up and join in, but they’re not going to commit to being there each and every time.
  • At-The-Game larper – They’ll be at almost every game, but they’re only interested in playing when they’re at those games. They’re not interested in continuing to play online between games, or putting in detailed downtime actions. If a game’s nearby they might discuss it a bit at the pub.
  • Active larper – They’ll be at almost every game, and will probably submit downtime actions between games so they can tie off loose ends and hit the ground running at the next game. They may well discuss recent or upcoming
    games at the pub, and might play the odd scene between games if it’d deemed necessary.
  • Lifestyle larper – As well as playing almost every game, they’ll happily continue to play their character online or in spontaneous face-to-face scenes. They’ll submit thorough and detailed downtime actions so that they’re fully aware of what’s going on and already have a plan of action before they arrive at the next game.

This doesn’t cover playstyles at the game at all, and doesn’t cover things like enthusiasm for costuming or hoiw comfortable they are with physical activity… but it’s a start point.

If you were trying to encompass all LARPers, I’d suggest that there’d be a lot of sets of archetypes which would be combined to create the final archetypes. Some examples might end up being “Active, Gamist, Physical Larper” or “Lifestyle, Performance, Abstract Larper”. More likely, though, is that you wouldn’t be trying to cater for everybody, and would be able to just create a set of 10-12 archetypes that covered most of what was needed.

In terms of characteristics, the list above only really considers three: Experience, Commitment and Out-of-Game Enthusiasm.

Taking character choice into account

The above list also only consider the players themselves, and not the characters their are going to portray – this is particularly relevant as people often choose to play somebody very different from themselves – being able to do so is a large part of the appeal for many people. If you then only consider the player, you are missing out what can be learned from their choice of character.

Thankfully, when players create or choose their characters, they are making a statement about what they want from the game.

Many game settings come with established groups that characters can be part of, and the choice of group implies that the player wants to have some engagement with the values of that group – either as somebody who supports those values or who rebels against them.

Similarly, many game systems come with predefined skills or abilities, and the choices players make when they initially chose or create are a statement about what they want or expect from the game. For example, a high level of combat ability and little else suggests that they wish to use that combat ability. A mix of combat ability and other skills suggests they expect there to be combat, but implies they wish the other skills to be important or relevant as well. If they have no combat skills, it suggests that they may wish to be able to avoid combat.

When looking at choices made on character sheets, you have to take the context into account – if combat is a default part of the game setting for instance, a choice of combat skills is essentially a choice of “I’d like my character to last more than an hour, please!”. In situations like that, what’s more important is where the choices the player has made for their character differ from the wider baseline. For example, if almost every character has taken basic comb at skills, those skills are not indicative of a choice. However, the players in that same game who have chosen to take advanced combat skills on top of the basic have effectively made a statement that they want to use those advanced skills. Similarly, players in that same game who have chosen to not take any combat skills at all are effectively making a statement that they want the skills they chose instead to be relevant.

When you are creating archetypes, it may well be worth thinking about commonly used combinations of important skils. If most of your first time players tend to be combat focussed, then that’s something to consider including in that archetype. If there’s a specific subset that chose to be completely non-combat, then perhaps they need to be a new archetype.

A lot of work for 10 players!

You might be thinking “But I only have 10 players at my LARP! This is too much work!”. You’re probably correct, especially if those 10 players are all you’re likely to have. Your time would be better spent going down the pub with them a few times and having a chat. However, for large systems or organisations with hundreds or thousands of players, this kind of thing suddenly becomes very valuable. I’d say that coming up with a few archetypes becomes worthwhile when there are more than 30 players, or when you have a high turnover of players and are trying to find out why.

User Interviews

User Experience Design

Whilst interviews can be useful when trying to come up with initial User Archetypes, I find they’re more useful when you’ve already made a first stab at getting some archetypes, or when you’re ttying to understand a particular need. I find this for two reasons:

  1. If you already have some archetypes, you can try to find people who are close matches to those archetypes. Your interview can then be used to better understand the archetypes and flesh them out, or it can be used as research towards creating a persona (more about them in a bit).
  2. If you already have some archetypes, you can try to find people who don’t really suit any of them. The interview will help you work out why they don’t fit, allowing you to modify existing archetypes to include them or add a new one that suits them better.
  3. If you already know of a need or requirement, but you don’t really understand it, the best approach is to find somebody who has that need or requirement and talk to them. You can then understand the need better, and find a way to express it in your personas or user archetypes and cater for it in future.

There are a lot of different techniques to user interviews, and they’re generally a tool I don’t get to use very much… but where I do I’ve found the following guidelines to be helpful:

  • Plan at least some questions in advance – If you try to interview on the fly, you’ll end up asking leading questions, and will get answers based more on how you asked them than what you wanted to know. People tend to like to “do well” in interviews, and so will often try to say what they think you want to hear, even if you tell them not to!
  • Avoid value judgements – It’s very easy to imply value judgements just by using the wrong word or even tone in a question. If the interviewee thinks that you don’t value their point of view, they won’t give it openly.
  • Avoid direct questions about what they want in favour of indirect questions about what their needs are and why – You may get a direct and honest answer, but it probably won’t be useful. It’s far more likely that you’ll get a direct answer without any context or nuance – and the chances are that you already know the direct answer, and it’s the context and nuance that you’re lacking! Instead, try asking what they want to achieve and why. If you asking this kind of question in couple of different ways around each thing you want to know, you’ll usually get the direct answer that you’d have got from a direct question and more information about the context and nuance.
  • If you can, have somebody else making notes, or video the interview and nake notes later – if you keep stopping to write notes, it leaves the interviewee with nothing to do but worry about if their answer was good or bad (it’s clearly one or the other, as you’re making a note), and means that you might miss something if they’re talking whilst you write.

Where can this be useful in LARP planning

The uses in a LARP Context are almost exactly the same as in a UX context. Interviewing some players will help you understand your players better. If you’re using user archetypes or personas they will help you flesh those out more too. If you’re not using those tools, the interviews can be useful just for some insight.

If intervi
ews are too much trouble, questionnaires can be useful too, but beware that ticky-box and multiple choice questionnaires will only ever give answers within the ranges you planned for, and questions that require written answers will be difficult when it comes to comparing answers. Both approaches are valuable, but have limitations. Other approaches that can be useful for getting responses based on thought rather than gut reaction are questions that ask the recipients to rank words or phrases in order of preference or importance, or that ask the recipients to place phrases or words under different headings.

Personas

User Experience Design

Personas may seem a lot like User Archetypes at first glance, and in many ways they are similar. Personally, I see Personas as a “next step” from user archetypes, and if used well they can be very powerful. Essentially, you build a fictional person based on one of your archetypes (or several fictional people if the archetype is quite broad), and you give them a name, goals, feelings and a context. Perhaps the best way to think of this is that a Persona is a character sheet and background for a fictional user, whereas a persona is just a character class in a sourcebook. You use the Persona’s “character sheet” to roleplay through a scenario involving your product or website.

This technique might seem a bit bizarre, but it is very effective indeed when it comes to helping you find bumps and glitches in the overall experience of the site. It helps get you away from your own knowledge of the product and lets you see problems you were blind to before simply because you already knew how it worked. In roleplaying terms, using your own knowledge of your product or site would be metagaming, and thereforce cheating!

The technique I tend to use for creating personas is one called Pragmatic Personas (by Jeff Patton), which is based around using knowledge you already have or can easily infer. How and why you already have that knowledge can vary – you may have already developed archetypes, or interviewed a bunch of people, or you may just know your users really well already and want to capture that tacit knowledge (knowledge in people’s heads, not accessible to others) and convert it into explicit knowledge (knowledge that’s recorded, findable and usable to others).

This technique has four stages to it, which I’ll outline below:

1. Identity

Pick an archetype or role and give it a name. If you’ve already created some user archetypes, this is a quick and easy step. Next, give the persona a name. A useful trick is to make the name and archetype alliterative – for example, “Oliver the Occasional User”. This makes it easier to get a quick grasp of the persona and so makes it quicker and easier to pick up and use. Giving them a quick sketch (that makes it stand out against the other personas) can help here too, as you can use the sketch as an icon to represent that persona.

2. Context

Write a quick summary of the situation of the persona. This covers their life in general, not just their interactions with your product or site. It should include other important things in their life, particularly if they may have a bearing on their involvement with your product or site. If they’re so busy that they only get to use your product or site occasionally, that’s an aspect of their life that should be noted – not just that they don’t use the product or site much, but why they don’t, and just as importantly, why they do use it on those rare occasions that they have time.

For example, “Oliver the Occasional User” has a job that doesn’t involve using your product, but once a month his boss demands that he generates a report that includes data that is only available from your product, and that he does it by lunchtime. So once a month he grits his teeth and tries to remember how to use it… and has to re-learn the product quickly enough that he can get the data and put it into his report in under an hour. He considers that usage an inconvenience and a distraction from his real job, and it always leaves him in a panic as he doesn’t really know what he’s doing.

3. About

Create a bulleted list of the goals or characteristics of the persona. This can be built from the identity and context. If you already have archetypes and have worked out sliding-scale characteristics that differentiate the archetypes (as explained in User Archetypes above), this is quite quick and easy. You simply build a sentence around each characteristic for the persona. Then, you look at the context and pick out any goals you can and note them down.

For example, “Oliver the Occasional User” might have the following:

  • Oliver has no budget to speak of – he’s a minion, not a master
  • Oliver uses the product very rarely
  • Oliver doesn’t really understand the wider capabilities of the product, and doesn’t really need to
  • Oliver has to produce a report on [Data X] by lunchtime
  • When Oliver uses the product, he’s panicked, in a hurry and under pressure
  • When Oliver uses the product, he’s going to be frustrated and annoyed by change, because it makes his life hard at a time when he needs it to be easy

4. Implications

Once you have the about section fleshed out, you can dig into it for things you can do to make this persona’s experience of the product a good one. You can then list those things as bullet points:

  • We must never tell Oliver he has to spend money – he doesn’t have any! Only display license renewal demands to people who can pay them.
  • We must never expect Oliver to spend time learning the product – he has neither the time nor the inclination.
  • We must never require Oliver to understand the underlying principles of the product – he just wants his data and doesn’t care about the product.
  • We need a clear reporting interface to find and create reports on [Data X] – Oliver doesn’t have time to research how to do it – he just needs to do it fast!
  • We need to avoid scary error messages in the reporting interface – Oliver’s already panicking – if he thinks he’s broken something he might have a heart attack!
  • We need to make it clear that the reporting interface can’t change, damage or delete data – If Oliver knows he can’t wipe or corrupt the data whilst creating his report, he’ll be less panicked about doing so.
  • When we change the reporting interface, we must make the changes minor and easy to understand – If Oliver comes to the reporting interface and finds it totally different, he might have a heart attack!

Once you have all of those, you have a set of requirements to start designing around, and a set of tests to work through when the product has been built.

When the product is being developed, you can pick up Oliver’s persona and roleplay through his use of the product. If you find that he’s being expected to understand the underlying principles of the product, or is presented with scary error messages, you know that these are problems that need to be addressed.

Where this could be useful in LARP planning

The uses for Personas are probably geared more towards the out-of-character logistics and bureaucracy of a LARP, although they could be useful for identifying problems with plot uptake and engagement as well.

In terms of OOC logistics, you might build a persona for “Fi the First Time Larper” that looks a bit like this:

Identity: Fi the First Time Larper

Context: Fi is a first year physics student, and
is about to attend her first ever LARP. She’s never done this before, and is a little bit nervous as some of her LARPer friends tend to get a bit obsessed about it… and she’s worried people will think she’s weird. She doesn’t know the rules and one of her friends helped her design her character. She’s using borrowed costume that doesn’t quite fit, and isn’t sure she’ll be able to afford her own that’s as good as what her friends all wear. She doesn’t have much money, and has no idea how her friends manage to pay for all their kit and events. Fi enjoys watching TV, reading and going to rock clubs. She is also a member of her university’s musical theatre society and is involved in putting on a show once a year.

About:

  • Fi has next to no money, and worries about how much things cost
  • Fi has no car, and relies on lifts of public transport
  • Fi has a lot of spare time in the holidays, but only weekends in termtime
  • Fi has no lasting commitment to the game, and worries that if she makes one, it will eat her life!
  • Fi has no experience of LARPing and minimal experience of tabletop roleplaying, and is worried she won’t “fit in”.
  • Fi doesn’t want to feel like a weirdo
  • Fi is both enthusiastic (or she wouldn’t be attending) and a little scared (they’re all a bunch of nutters).
  • Fi is worried that she won’t understand the rules, or that she’ll be buried in trying to learn them all at once.
  • Fi is worried that she won’t know what’s going on

Implications:

  • We must keep the cost:value ratio low enough that Fi can afford to play. This doesn’t mean we must be cheap, just that we must represent value for money. Comparisons to other activities students are prepared to pay for are a good idea. (Publicity)
  • We must make sure the event is accessible by public transport, or provide a means to collect people from nearby transport hubs (Logistics)
  • We must try to schedule events within holidays, or run events that Fi can can travel to, play and get back from within a weekend. (Logistics)
  • We must ensure that Fi doesn’t have to be so heavily involved that she must give up her other hobbies – it must be possible for her to miss a game or two and still be involved. (Plot / Publicity)
  • We must not require that Fi spends her entire life involved in the game to stay involved – she must be able to just play at events without being sidelined. Make online play in downtime an optional extra, not a requirement! (Plot / Setting / System)
  • When Fi arrives on site, we must ensure that she is made to feel welcome and not out of place. Welcome team? Newbie guides? Player Mentors? (Setting / Publicity / System)
  • We must ensure that Fi knows that people from all walks of life enjoy LARPing – including people with serious, respectable jobs. (Publicity)
  • We must make sure that Fi’s initial enthusiasm is channelled into getting her involved and active – if we ignore it, we’ll lose it. Newbie plots? IC structures to bring in new characters and get them involved? (Plot / Setting)
  • We must make sure that Fi can pick up the basic rules quickly and easily, then pick up the more complex stuff as she goes along. We must not require her to memorize a whole book of rules before she joins play. (System)
  • We must find ways to introduce new players to the setting and IC structures without swamping them with unfamiliar terminology or ideas. (Setting)
  • We must find ways to allow new players to engage with core plotlines without knowing all of the history from previous games. (Plot)

This gives us a whole bunch of requirements that should be met for Fi’s experience to be a good one. If the team running a LARP were to meet all of those, they’d support new players pretty well. To use the persona when planning their games, they’d just need to step through what they think Fi’s experience of the LARP should and at each step, think “what happens now?”. If at any point you can’t think of an answer, or if the answer relies on Fi magically knowing what she’s meant to do without being given any clues, then there’s a problem that needs to be addressed.

Essentially, the Persona above is a character sheet and background for Fi, and the LARP organiser would play her as a character, roleplaying through the scenario of her arriving at her first LARP. Wherever Fi’s player gets lost, confused, or has to rely on out of character knowledge, you’ve found a problem with Fi’s experience, and an issue that you need to address.

This roleplaying of what Fi goes through, the decisions she makes and the actions she takes is called a user journey or a user flow, and I’ll discuss these in more detail in a future post.

In Conclusion…

The above are three techniques from User Experience Design which may be useful in planning or running LARPs. in Particular, I see them being useful to large LARP events, or large societies which run linked smaller events. Individual small games may find them useful if they have a playerbase that don’t know each other that well, but will almost certainly be in a better position to talk to all of their players, rather than having to use these techniques to represent them.

As with the previous post, I’m very interested in feedback and comments on any of this!

LARP and the User Experience – Part 1

An Introduction

This is a big topic, so I’m probably going to ramble on about it a fair bit. My notes are already longer than a typical full post, so I’m going to break things up a bit. In this post, I’m going to talk about similarities between the considerations for LARP and the considerations for UX. I’ll probably also plough through some introductory ideas to delve into more deeply in later posts.


What is User Experience?

User Experience (often abbreviated to UX) is exactly what it says on the tin – it’s what a user experiences when they use something. People who work in the UX field both study that experience and try to design what that experience will be. It’s often seen as a bit wooly and ill defined, but usually by people who don’t quite grok design as a field in general. It’s a subdivision of the design field that focusses on the users perception of their interaction with the designed thing.

In my case, I’m a user experience designer who focusses on the web and software user interfaces. Wikipedia has a bunch to say about the job, some of which is probably contentious.

What is LARP?

LARP is difficult to pin down as there are so many different flavours. What they all boil down to is a group of people getting together to play out their characters actions when faced with given situations. Sometimes this takes place within fantasy or science fiction settings, sometimes in a setting based on the real world. Sometimes there is horror, or special effects. Sometimes there’s a nice cup of tea. Sometimes this involves people having to fight, using rules to abstract the combat away, sometimes they have at each other with replica weapons – and all kinds of shades in between. Sometimes there’s a pre-defined plot, and sometimes there’s just a starting situation and the players determine everything that happens from there. LARP often goes by other names – Freeform, LRP, Live Gaming, Interactive Theatre or even (jokingly) Cross Country Pantomime. For convenience sake, I’m going to just stick with LARP.

The Similarities

There’s a big similarity – both are about experience… and I don’t just mean in the sense that some old-school roleplaying games are all about gaining more experience points by killing gribbly things! I mean that both of them are about understanding how people percieve the environment that they are in, how they interact with that enviroment and how they percieve the results of their interaction.

There are a few differences in the fine detail here, of course, and in both cases it goes a bit deeper than you might first think.

How does it go deeper?

For the web user experience, the environment appears to be just the webpage at first glance… but it goes beyond that and into the environment and situation of the user. For example, they might be browsing on a mobile device, hoping for an answer that they need to act on right now – for example, standing at a street corner in the rain and using google maps to help them decide which way is quicker so they can get somewhere dry. Or they might be browsing on their home machine, in the warm and dry… looking for which route from the same street corner is quicker so that they can walk it at their leisure at a later time. The task they’re trying to do is the same, but their needs and the experience are quite different.

For the LARP player, the environment appears to just be the physical objects and events around them. Again, it goes deeper than that. They might be standing in a room looking at a box on the ground with a warning label, trying to decide if their character is curious enough to pick up or open the box. In another situation, the same player might be standing in the same room, looking at the same box, and trying to determine if the box is there “in character” or if it’s something “out of character” that they should be ignoring. They’re both trying to establish how to react to the box, but the reasons they’re trying to do so and the needs and experience are different.

How do they relate?

Those two examples aren’t completely analagous, but they have enough similarity for them to be relevant. One is affected by the user’s situation outside of their use of the site, and the other is affected by the situation outside of the game. In one, the user’s “real world” environment is still there, and it affects their experrience of the site. In the other, the player’s “real world” environment is still there, and it affects their experience of the game world.

Some Concepts, Techniques and Approaches

When it comes to designing a website or a user interface, there are certain concepts that you need to understand, and certain things you can do to try to make users enthusiastic about using the site or UI, so that they’ll do so again. Likewise, there are certain concepts in LARP that you need to understand. I’m going to try to explain some of these below.

Affordances

Affordances are things that inform the user “hey, you can interact with me”, whilst simultaneously making it clear how the user should interact with them. Below are a few examples of what could be seen as affordances in either field, and the obvious responses to them:

Web / UI Affordances LARP Affordances
  • Labelled buttons – users should click them to cause an action
  • Links – users should click them to go where they lead
  • Menus & Submenus – users should open them to see more options
  • Menu Items – users should click them to cause an action
  • Checkboxes – users should check them to turn on a setting
  • Drag-and-drop handles – users should “grab” the item and move it to where they want it.
  • Non-Player Characters – Players should talk to them, observe them or interact with them
  • Monsters that attack you – Players should fight or run away
  • Seeded rumours – Players should look for clues or events behind the rumour
  • Locations marked on a map – Players should visit the locations
  • Orders from a superior – Players should follow the orders
  • Missing artifacts – Players should look for clues to their location

In web and UI design, you use affordances to make the available options clear to your users. You can’t force them to use them (well, not usually, anyway) but you can make it clear what they are able to do from their current position in the site or UI. If you want to encourage certain actions, you can make the affordances for those actions clearer, simpler or just plain bigger. Of course, there will always be users who want to do something a bit different, and they can do so using the other, less apparent affordances available to them – they might explore for a while, but when it comes down to it, they can’t easily interact without using the affordances they’re given.

Similarly, in a LARP, the affordances are a way to give the players possible courses of action – you can’t force them to follow them (or if you do they may resent it) but you can make certain paths and c
ourses of action clearer and more obvious if you wish players to go down that route. Often players will want to go completely off-piste and do something you hadn’t prepared for – but that’s fine too, as the only way that they can really do so is by interacting with the affordances they’ve been given… namely the game world in which they are playing. They might pick an affordance you hadn’t planned for, but if you know your setting well enough then you can let them explore the environment until they find a way back into territory that you’d planned for.

Personas

Personas are a tool used in UX circles to describe a user of a particular archetype, explaining what they want from a game, what kind of experience they might want and why it’s relevant to the developers. In the examples above I explained how the users situation and environment can affect the experience they want… well, personas can be used to differentiate between types of user and the situations in which they tend to use the site or UI. Putting these together is useful but often time consuming – part of the idea is that the users are often different and have different wants and needs to the developers, so you have to do a lot of research to find out about those people.

In a LARP it’s actually a little more complex, as you have both the player and the character they are playing to think about, but you have a means to cheat. It’s not perfect, but it’s a step in the right direction. Character Sheets. Every character will usually have something like a character sheet, and if they’ve picked or prioritised certain capabilities, it’s likely that they’d like to see these come up in their games. This doesn’t directly cover the behaviour of the player, but it can serve as an indicator of what they’re looking for, even if it doesn’t cover how they’ll behave when they’re playing.

By taking a selection of character sheets for a game, you can probably pick out what is important to various players and use that to influence what you include in the game. There’s more work to be done to make sure you fulfil other player requirements too, but this is a good start.

User Flows / User Journeys

Whilst affordances tell people what they can interact with next on a given page, User Flows are a way of mapping out a path through several parts of a site or a UI. They are used to map out the experience of performing a task or achieving a goal that takes them across multiple screens on the site. Usually, you would map out the optimal path for a user to move through the site or UI to achieve their goal, which in turn leads to thinking about how users can diverge from that ideal path, explore the site for a while and then return to the path. What is key is that there usually isn’t just one of these for a site – there are usually many, depending on what the user is trying to achieve and what behaviour they are likely to exhibit along the way. They also don’t have to be a single path. Whilst having one optimal path for the user who just wants to get things done as quickly as possible is a good plan, having alternatives for users who want to explore is a good idea. Likewise, ensuring that there are places where users can be pulled back in to a flow after they’ve made a mistake or become distracted is helpful too. Sometimes this can even be a way to encourage the user to learn more complex features of the site – by making the simple route obvious, but the more advanced options more apparent if you diverge from the optimal path.

A lot of techniques used for mapping out user flows can also be useful for mapping out how a plot is likely to work. Certainly the idea of making sure that your players have at least one clear path through your plot is absolutely essential. If they feel that they’ve hit a brick wall and can’t see how to get to encounter B from encounter A then you’ve got a problem, and you need to add some affordances to make their route clear. Likewise, you can have the easy but less rewarding path most obvious, but reward exloration of the setting by having some perhaps more rewarding variations available if they deviate from that obvious route a little.

This is one of the areas where LARPing feeds directly back to UX work – when planning a LARP, you have to have a good sense of story, and of how people will piece things together to come to conclusions… and how to understand stepping though stimulus, action and effect, which maps on to affordance, action and result.

Future Topics

Future Topics are likely to include, but not be limited to:

  • Atmosphere, mood and the user/player experience
  • Encouraging exploration
  • The New LARPer experience
  • Mapping the experience of a typical LARP

Feedback Welcome

This post has become plenty long enough at this point, so I’m going to break it off here. It will pick up again in a future installment. I welcome feedback on this topic, as it’s something I’m still working out in my head – I can see and use the similarities, but explaining them is a different matter. Feedback will give me clues about how to explain things better, and perhaps even lead to me explaining more about how to do things.

« Older posts

© 2024 Eggbox

Theme by Anders NorenUp ↑